LED Blink
Objective:
To activate the in-built LED available in the Arduino Uno Board
Components Required
- Arduino Uno
- LED
- Resistance (100 Ohm)
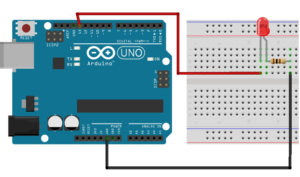
Connection Diagram

Procedure
- Give the Connection as per the Connection Diagram
- Connect the Arduino with the PC / Laptop
- Go to the “Tools” and click “Port” tab and Click the COM port for Enable the “Tick” mark
- Upload the Program corresponds to the Lesson / Project
Program
int LEDpin=2;
void setup()
{
pinMode(LEDpin, OUTPUT);
}
void loop()
{
digitalWrite(LEDpin, HIGH);
delay(1000);
digitalWrite(LEDpin, LOW);
delay(1000);
}
Working
The Program Activates the LED to ON by supplying HIGH voltage to it and making it OFF by supplying LOW voltage to it. This process repeatedly happens to make the LED blink continuously
Output
The LED near Pin 13 starts Blinking continuously
Applications of LED
Traffic Light
LED Displays
LED Televisions
Exercise
Increasing / Decreasing the Blink Period
Repeat the same using Different Digital Pins
Repeat the same using Different Resistance Values


